Curing & Drying Chambers
I’ll start with the confession, because it’s the whole reason this page exists. Go back through my collection — through the salamis, the Landjäger, every dry-cured stick — and you’ll find recipes that tell you the grind, the cure, the spices, the ferment, and then get vague at the exact moment that matters most: where the sausage hangs to dry. “Hang in a cool place.” “Dry until firm.” That’s not a recipe; that’s a hope. And it’s not just my recipes — it’s almost every home dry-cured recipe ever written. The chamber is the biggest gap in home sausage-making, and I’m as guilty as anyone.
Update, and I’m pleased to be able to write it: the five raw Landjäger formulas I added in July 2026 are the first recipes in the collection that don’t do this. Every one of them names a chamber temperature and humidity, a pH target, and a weight-loss finish on a tagged pair — Swabian at 54–59°F and 75–80% RH to 30–40% loss, and the Alpine Butcher’s Schedule going further and stepping the chamber down 64°F → 61°F → 50–57°F as the ferment gives way to the dry. Writing them was what made me realize how completely the rest of the collection dodges this. Not one German, Austrian or Swiss source I read while researching them states a weight-loss number at all — they say “longer is firmer” and leave you to it. The gap is real, it’s nearly universal, and it starts closing one recipe at a time.
Here’s why it matters so much. For a raw dry-cured sausage there is no cooking step — it is made safe and made delicious by controlling its environment over days and weeks. Get the temperature and humidity right and you get a safe, evenly dried, deeply flavored stick. Get them wrong and you get, at best, a ruined batch, and at worst something dangerous. A brisket forgives you; a three-week salami hanging in an uncontrolled basement does not. So this page is the thing the recipes skip: what a curing-and-drying chamber actually is, how to build one, and the temperature and humidity numbers to run it at.
What the chamber is doing
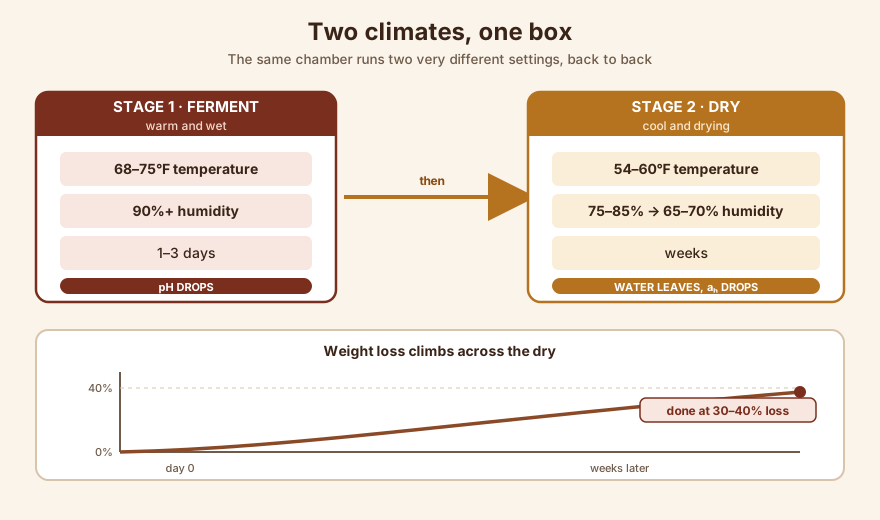
A dry-cured sausage passes through two different climates, and a good chamber gives you both, one after the other:
- Fermentation — warm and very humid. First you want the lactic-acid bacteria to wake up and drop the pH fast, which they do in warmth. This stage is short: roughly 68–75°F (20–24°C) at 90%+ relative humidity for about one to three days, until the sausage has soured to its target pH. High humidity here keeps the casing from drying and sealing before the inside has fermented.
- Drying — cool and moderately humid. Then you drop the temperature and, slowly, the humidity, and let the sausage lose water over weeks. The target window is roughly 54–60°F (12–15°C) at 75–85% relative humidity, easing down toward 65–70% as it finishes. This is the long haul — the stage that pulls the water activity down to where the sausage is shelf-stable and safe.
If you only remember one all-purpose setting, about 55°F and 75% humidity is the classic dry-curing climate. But the real craft is running those two stages in sequence in one box — a warm, wet ferment, then a cool, steady dry.
The enemy has a name: case hardening
Before the build, understand the failure you’re building against, because everything about a chamber is designed to prevent it. Case hardening is what happens when the outside of the sausage dries faster than the inside can catch up: the surface shrinks into a hard, sealed shell while the core is still wet. Now you’ve trapped moisture in the center with no way out — the sausage can’t finish drying, and that wet, warm, low-oxygen core is exactly where spoilage and worse can set in. From the outside it looks done. Inside it’s a problem.
Case hardening comes from air that’s too dry, too fast, or too still-then-blasting. The fixes are the whole point of a chamber: keep the humidity high and steady so the surface never races ahead, move the air gently and intermittently so moisture leaves evenly without wind-drying the skin, and don’t rush the temperature down or the humidity down. Slow and steady dries a sausage all the way through; fast and dry ruins it from the skin in.
Building one — a fridge and three controls
You don’t buy a home curing chamber so much as assemble one, and the standard build is genuinely achievable. Start with a refrigerator or a wine fridge — a used one is fine — as the insulated box. Then add three controls, because a fridge on its own only knows how to do one thing (get cold) and you need to govern three variables: temperature, humidity, and airflow.
1. Temperature — an external controller. A fridge’s own thermostat won’t hold 55°F; it wants to hold 38°F. So you plug the fridge into an external temperature controller (an Inkbird, Auber, or Johnson unit — the same kind of plug-in controller people use for fermenting beer or sous-vide), put the controller’s probe inside the chamber, and set it to your target. The controller switches the fridge’s compressor on and off to hold your number, overriding the fridge’s built-in cold. For the warm fermentation stage, you can even add a small heat source on the same kind of controller.
2. Humidity — a humidifier and a way down. This is the part fridges can’t do at all. To raise humidity, add a small ultrasonic humidifier inside, run off a humidistat (a humidity controller, exactly like the temperature controller but for RH) that switches it on when the air gets too dry. To lower humidity — because a running compressor and a sealed box can also get too humid — you need a way down: a small dehumidifier, a tray of desiccant (silica or calcium chloride), or simply letting the fridge’s compressor cycle, which condenses water out. A humidistat managing a humidifier against the box’s natural drying is the heart of the whole rig.
3. Airflow — a small fan on a timer. Still air grows mold in pockets and dries unevenly; a gale case-hardens. The answer is a small, low-speed fan on a cycle timer — a computer fan is plenty — running in short intervals to keep the air gently turning over without ever blasting the sausage. Intermittent and gentle is the rule.
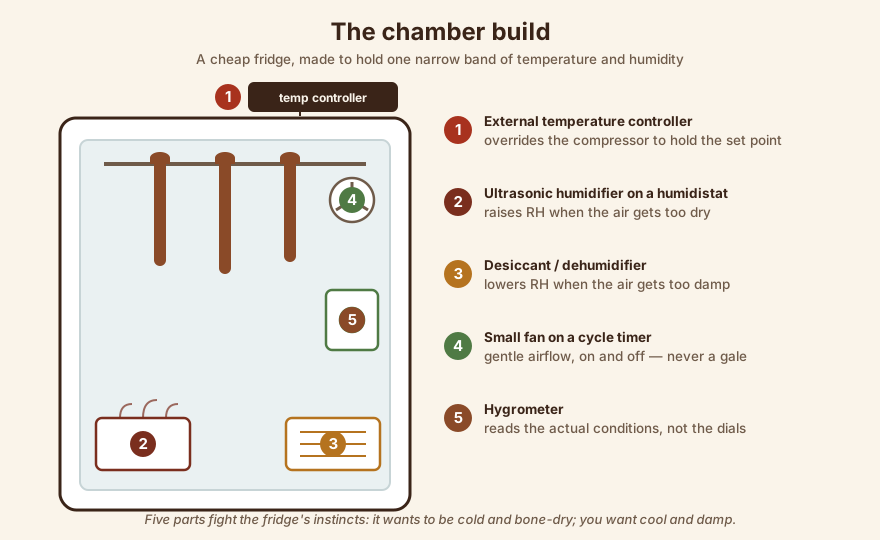
That’s the whole machine: an insulated box plus three feedback loops. Commercial curing cabinets do exactly this in one appliance, precisely and expensively; the fridge build does it for a fraction of the cost if you’re willing to tune it.
Measuring what you can’t see
A chamber you can’t measure is a chamber you can’t trust, and humidity is the sneaky one — you cannot feel the difference between 70% and 85% RH, but your sausage can. So you need a hygrometer in the box, and a good one. The most accurate traditional tool is a psychrometer, which reads a dry-bulb and a wet-bulb temperature and derives the relative humidity from the difference — it’s what a commercial smokehouse or curing room uses. A digital hygrometer is more convenient; just calibrate it (the salt-in-a-bag test gets you a known 75% reference point) because cheap ones drift.
I’ll be honest, the way I am on my bench page: I don’t own a psychrometer, and I don’t yet have a dedicated curing chamber. It’s the real hole in my kit. I’ve dry-cured by feel — a cool corner, a careful eye, and above all the scale — and I’ve gotten away with it, but “gotten away with it” is not a method I can hand you in good conscience. The chamber is the upgrade that would let me stop guessing.
The scale is your real humidity gauge
Here’s the practical truth that ties the chamber to safety: weight loss is the number that actually tells you a dry-cured sausage is done. Relative humidity and temperature are the conditions you control, but the outcome you care about is water activity — how much available water is left for bacteria — and at home the honest proxy for that is how much weight the sausage has lost. Weigh it going in (“green weight”), tag it, and weigh it as it dries. A traditional dry stick like a Landjäger or a salami is done at roughly 30–40% weight loss; a cooked semi-dry loses only ~15% because the cook already made it safe. The chamber’s job is to get the sausage to that weight loss evenly and without case hardening — and the scale, not the calendar, tells you when it’s there.
Mold — the chamber grows it, good and bad
One more thing a chamber does, for better and worse: it’s a warm-ish, humid box, so mold will grow. On dry-cured sausage that’s not automatically bad — a powdery white mold (the Penicillium used on traditional salami) is desirable, protective, and part of the flavor. What you don’t want is fuzzy green, black, or slimy growth, which means the humidity or airflow is off. Managing mold is its own subject that belongs with the curing-and-cooking section when it ships; for now, know that the chamber is where it lives, and that a clean, well-circulated, correctly-humid box grows the good kind and discourages the bad.
Why this is the safety hurdle, not a nicety
I want to close by connecting the appliance to the danger, because it’s easy to read all this as fussiness. It isn’t. For a raw dry-cured sausage, the chamber is one of the hurdles that makes it safe to eat. The cure suppresses botulism, the fast ferment drops the pH before Staphylococcus aureus can make its heat-stable toxin, and the controlled dry pulls the water activity down to where nothing dangerous can grow — and that last hurdle is exactly what a chamber delivers. Skip it, or fake it in an uncontrolled space, and you’ve kicked out one of the three legs the whole thing stands on. That’s why “hang it in a cool place” is such an inadequate instruction, and why building the box is the difference between hoping a salami is safe and knowing it.
It’s the next thing I’m going to build. When I do, this is where the photos of it go.
Part of Sausage Equipment. Next: thermometers and scales — the measurement that turns all of this from hope into method. Back to the sausage program.
Comments (0)