Plates & Knives
The plate and the knife are the business end of the grinder — the two parts that actually cut the meat — and in forty years I’ve found them to be the most misunderstood pieces of the whole kit. People spend a thousand dollars on a grinder and then run it with a bent knife and a plate somebody else’s grandfather wore out, and they can’t figure out why their sausage comes out looking like wet paste. It’s almost always here. The auger just pushes and the motor just turns; the cut happens in the last quarter-inch, where a spinning knife sweeps across the face of a fixed plate. Get that quarter-inch right and everything downstream gets easier.
I lay out how the whole grinder works — the worm, the pressure, the stack order, why a dull edge smears the fat — on the grinder page. This page is just the two cutting parts: what the holes do, why the knife and plate are a matched pair you can’t break up, how to keep them sharp, and the specialty plates and stars I keep for stuffing. If you only fix one thing about your grinding, make it this.
What the holes do
A grinder plate is a flat steel disk drilled with a field of holes, and the diameter of those holes is what sets how fine or coarse your grind is — nothing else. Not the grinder’s size, not the motor, not the knife. The meat gets sheared against the fixed edge of every hole and extruded through it in a column; small holes make thin columns, big holes make fat ones, and that column diameter is essentially your particle size. That’s the entire principle.
It’s worth being clear that the plate’s hole size and the grinder’s number are two completely different things that both get called “size,” and mixing them up causes no end of confusion. The grinder number — a #8, a #12, a #22 — is the diameter of the whole plate and its matching throat, and it tells you nothing about grind fineness; it’s just which grinder the plate fits. My grinder is a #12, so I buy #12 plates, and every one of them — from the finest to the coarsest — is the same 2¾-inch disk that drops into the same head. The holes in that disk are what change. I get into the number system on the grinder page; here, forget the number and think only about the holes.
Here are the sizes I actually keep and reach for, in both inches and millimeters, because plates get sold both ways and the two don’t convert cleanly — these are the conventional pairs the trade uses, not exact arithmetic:
| Hole size | Imperial | Name I use for it | What it’s for |
|---|---|---|---|
| 3 mm | ⅛” | Fine | Hot dogs, bologna, a fine emulsion base, a burger grind, the finest second grind |
| 4.5 mm | 3/16” | Second-grind | The classic finishing plate — breakfast sausage, Polish, most German links |
| 6 mm | ¼” | Regular | Summer sausage, salami, pepperoni, snack sticks |
| 10 mm | ⅜” | Coarse | First grind, chorizo, linguiça, chili grind |
| 12–13 mm | ½” | Coarsest | First grind on a fatty cut, coarse chili, stew meat |
| ~19 mm | ¾” | Chunking | The pre-break — knocking big cuts down before a real grind |
I keep a chart of exactly which plate goes with which product taped to the wall over my grinder, and it’s on my bench if you want to see my whole lineup. The short version of how to think about it: the plate is a texture dial. Coarse holes leave the meat and fat in distinct, visible particles — the loose, rustic bite of a good coarse-ground chorizo or my grandfather’s kielbasa, which I take no finer than a ¼” plate and often coarser. Fine holes break everything down toward a smooth, tight paste that binds into the snappy, uniform body of a hot dog. Most of what I make lives in between, and most of it gets two grinds — a coarse first pass through the ⅜” or ½” to move the meat fast and set the fat-to-lean, then a second pass through the 3/16” to tighten it up and build a cleaner bind. Forcing everything through a fine plate in a single pass overworks the meat and heats it, and heat is the enemy — so coarse-then-fine beats fine-once almost every time. The full single-versus-double-grind logic is on the grinder page.
⭐ The matched pair — the thing almost nobody knows
Here is the single most important thing on this page, and it’s the thing I see gotten wrong constantly: your knife and your plate are a matched, lapped pair, and you cannot mix them up.
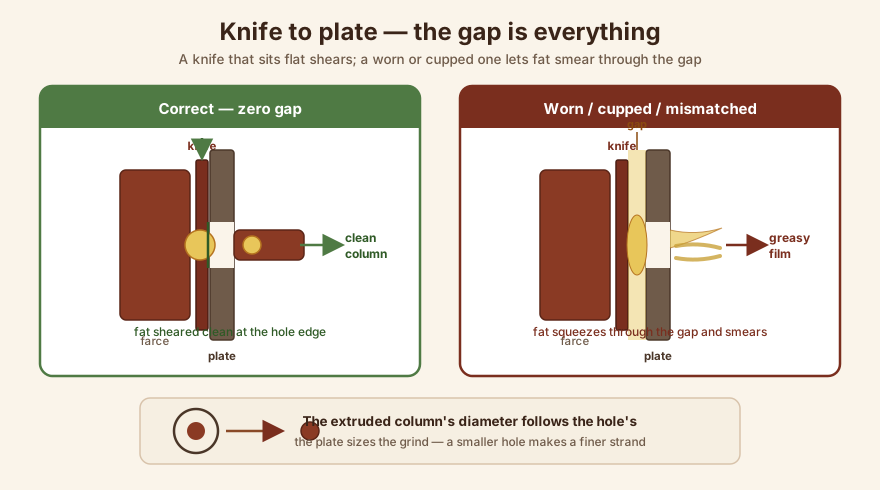
Let me explain what that means, because it’s not obvious. When you run a grinder, the flat cutting face of the knife rides directly against the flat back face of the plate — steel on steel, spinning, under light pressure from the retaining ring. Cutting happens because those two flat faces meet with essentially zero gap, the way the two blades of a good pair of scissors meet: one edge moving, one edge fixed, no daylight between them. That’s a true shear, and a true shear cuts fat and connective tissue cleanly.
Now — those two steel faces are pressed together and spinning against each other every time you grind. They wear. And they don’t wear independently; they wear each other flat, into a shared mating surface. The knife polishes itself to that particular plate and the plate polishes itself to that particular knife. After a few batches they’ve lapped together — they’ve become a set that mates perfectly, flat against flat, with no gap anywhere across the face. That’s a good thing. That matched wear is exactly what keeps the shear clean.
Here’s the trap. The moment you break up that pair, you lose the flat contact. Put a knife that’s been lapped to Plate A against a different Plate B, and the two faces no longer match — one has worn hollow where the other worn proud, and now there are microscopic gaps between them. Same thing happens if either part gets cupped or dished — worn concave, or bent, or lapped unevenly by somebody who didn’t know better. Any of those opens a gap between the knife and the plate.
And a gap is a disaster, because a gap means the meat is no longer sheared — it’s crushed. Instead of the scissor action slicing cleanly through fat and gristle, the two faces mash the meat between them and squeeze it through the gap. Soft fat, which is the first thing to suffer, gets smeared into a greasy paste and worked into the lean, coating every particle. The output comes out wet, dense, and pasty instead of a clean grind of distinct particles. This is the notorious fat smear — the single most common ruined-batch complaint there is — and a mismatched or cupped knife-and-plate is one of its two big mechanical causes.
I want to be honest about the causal order, because it matters and most sources get it backwards. Fat smear is a temperature failure first. Fat is only a firm, cuttable solid while it’s cold; let it warm toward body temperature and it softens, then starts to render, and warm soft fat will smear through the smallest gap no matter how perfect your setup is. So the first rule is always cold meat — I grind at about 30°F, half-frozen — and I go into all of that on the grinder page. But a mismatched or dull knife-and-plate is the second cause, and it compounds the first: a bad edge adds friction, which adds heat, which softens the fat, and it mechanically crushes instead of shearing. Warm meat plus a mismatched set is the worst case, and the two failures feed each other. Keep the meat cold and the shear clean and you’ve closed both doors.
So the rules that fall out of all this are simple, and I follow them without exception:
- Keep every knife with its plate. I mark my sets so they never get separated. A knife and a plate that have grieved together stay together.
- Keep both dead flat. No dishing, no cupping, no bent knife. If either face isn’t flat, the pair is broken even if it’s the “right” pair.
- Keep both sharp. A sharp edge shears; a dull one drags and crushes. More on that below.
- Set the contact pressure right. The retaining ring holds the knife against the plate, and it wants to be snug, not cranked. Hand-tight, then just a touch more. Too loose and the plate floats a hair off the knife — that’s a gap, and you get smear. Too tight and the knife binds hard against the plate, overheats, drags the motor, and can stall it. Snug is a real setting, and you learn the feel of it.
If your grinder “used to cut fine and now smears,” and the meat’s cold, this is the first place I’d look: somebody mixed up the sets, or a face got dished, or the ring’s a hair loose.
Sharpening and lapping — a sharp cheap set beats a dull expensive one
Both faces have to be dead flat and sharp, and you can restore both yourself. This is called lapping, and it’s the same operation whether you’re flattening a cupped face or renewing a dull edge — you’re grinding the flat face of the steel against a truly flat abrasive until it comes back true and keen.
You need a genuinely flat reference surface. The two I use are thick plate glass and a granite surface plate — either one is flat enough to trust. On top of that goes wet/dry sandpaper, worked wet, progressing through the grits from coarser to finer; some folks use a lapping compound (fine abrasive suspended in grease) instead. You lay the flat face of the plate down on the paper and work it in a figure-eight until the whole face comes up uniformly bright — a dished plate will show you exactly where it’s low, because the low spots stay dull while the high spots polish first. Same for the knife: its cutting faces get lapped flat and bright. You are only ever flattening the flat faces. You do not touch the inside of the plate holes and you do not try to reshape the knife’s cutting geometry — round the hole edges and you’ve wrecked the shear.
The best method actually laps the two together. Because the whole point is that the knife and plate mate flat against each other, you can put a little abrasive between them and spin them against one another — some people just chuck the knife on the auger and run the grinder briefly with lapping compound and the plate under light ring pressure — so they re-mate as the matched pair they’re supposed to be, with no gap. That’s what the commercial sharpening kits (TSM and Sausage Maker sell one) are built around: a ceramic stone sized to the knife and another to the plate, loaded together using the grinder’s own locknut so they lap flat and matched. You can buy that kit or you can do it on glass; both work.
How do you know when they’re worn? A few tells I’ve learned to read:
- The grind changes before anything looks wrong. The output goes from distinct particles toward a wetter, pastier texture, and you start seeing smear on a batch that’s cold and should be clean. That’s the edge going, or the faces losing contact.
- You can see the dishing. Lay a straightedge across the knife face or the plate’s back face against the light — a worn face won’t be flat, and you’ll catch daylight under the straightedge at the center or the edge.
- The plate holes get a rounded, polished lip on the cutting side instead of a crisp edge. Crisp edges shear; rounded ones crush.
And the thing I most want a beginner to hear: a sharp cheap set beats a dull expensive one, every single time. I’d rather grind with a ten-dollar plate I sharpened this morning than a premium plate that’s been dull for a year. The steel matters less than the edge. Carbon-steel plates take a keener edge than stainless and are common on good grinders, which is why they’re worth the small extra care they need (see rust, below). But a keen edge on a modest plate will out-cut a dull edge on a fancy one all day. Sharp and flat and matched — that’s the whole recipe, and it costs almost nothing but attention.
⭐ Stuffing plates and stuffing stars — pushing farce, not grinding it
There’s a whole second job the grinder can do, and it uses special plates — I keep both kinds, and they’re on my bench plate chart.
A stuffing plate — I’ve heard it called a “bean plate,” which is just hobby slang — is a plate with one large hole, or a few big holes, and no field of small ones. You run it without a knife on the auger at all. With no knife there’s no shearing; the auger just pushes the meat straight through that big opening and out a stuffing horn into a casing. A stuffing star (also called a cone) does the same job a different way — it’s a star- or cone-shaped piece that sits where the knife and plate would go, taking up the auger’s forward thrust while leaving a clear path out to the horn. Either way, the idea is the same: turn the grinder into a pusher so it drives already-ground farce into casings. I have both a bean-style stuffing plate and a stuffing star, and they both work.
But I’m going to be straight with you, the way I wish somebody had been with me: stuffing through the grinder is a compromise, and a real stuffer is better. Here’s the honest problem. When you feed ground meat back into the grinder to stuff it, you’re running it through the auger again — and the auger drags, compresses, and re-works the farce it’s pushing. That re-working does two things you spent the whole grind trying to avoid: it re-smears the fat, because the meat’s getting squeezed and worked a second time, and it whips air into the farce as you stomp it down the throat. Those air pockets end up as voids under your casing, and the re-smeared fat can grease out when you cook. A dedicated vertical piston stuffer, by contrast, doesn’t re-grind anything — it drives an intact, solid column of farce out with a piston, preserving the grind you worked to get and pushing far less air. It’s simply the right tool.
So why keep the stuffing plate and star at all? Because they get you started without a second machine, and for a small batch here and there they’re genuinely fine — a little slower, a little more air, but they’ll stuff a few pounds of breakfast links and nobody at the table will file a complaint. If you make sausage often, though, a real stuffer is the upgrade I’d point you at, and I lay out exactly why on the stuffers page. I motorized my own vertical stuffer, and the day I did, grinder-stuffing went in the drawer for good.
Kidney and relief plates — a light note
You’ll run across the term “kidney plate” or “relief plate,” and I want to mention it honestly without overclaiming, because the naming here is genuinely muddy and I’d rather flag that than fake certainty. The function is real and reliable: some plates are cut with a large kidney-shaped relief, or with a few enlarged sectors instead of a full field of round holes, and they’re used as a first-break or pre-cut plate — a very coarse pass whose job is to knock big cuts down while reducing back-pressure and heat on that first grind. That much I’m confident about. What I’m not confident about is that everyone means the same thing by the name — “kidney plate” gets used loosely across dealers and forums, and I couldn’t pin down one authoritative definition. So take the idea (a coarse relief plate for the first break) and hold the exact name loosely. My ¾” chunking plate does the same first-break job for me, whatever you call it.
Rust and care — carbon steel will flash-rust on you
The good plates and knives, the ones that take a keen edge, are usually carbon steel — and carbon steel will flash-rust if you leave it wet, sometimes within the hour. I’ve pulled a plate out of the drainboard the next morning speckled orange because I got lazy. So the care routine is not optional, and it’s simple:
- Wash promptly, get all the fat and meat out of the holes — an old toothbrush is perfect for clearing the holes.
- Dry thoroughly. Not “shake it off” — actually dry it, and if you want to be sure, warm it a moment so any water in the holes flashes off.
- Wipe with a food-safe oil before it goes away — a light film of mineral oil or any food-grade oil is plenty. That film is what stands between the steel and the humidity.
- Store dry, with the knife kept with its plate so the set never drifts apart.
Stainless plates resist rust and skip most of this, but they don’t hold an edge as well as carbon — that’s a real trade-off, not a free upgrade, and it’s why plenty of serious makers stay with carbon and just do the thirty seconds of care. Whichever you run, the enemy is standing water. Dry it, oil it, and a good plate will outlast you.
That’s the whole business end. The plate is your texture dial, the knife is its lapped partner, the two live and wear and get sharpened as a set, and the specialty plates turn the grinder into a passable pusher when you don’t have a stuffer yet. Keep them cold-friendly, sharp, flat, and matched, and the fat smear that ruins so many batches simply doesn’t happen here.
Part of Sausage Equipment. Next: once the meat’s ground, you have to get it into a casing — the stuffers page is where the real tool lives. Back to the sausage program.
Comments (0)