Casings & Their Tools
Every page in this section up to now has been about turning meat into farce — grinding it, keeping it cold, driving it out of a stuffer in a clean solid column. This page is about the last thing that column goes into, and the handful of small, cheap tools that tame it. The casing is where a sausage stops being ground meat and becomes a link — it’s the skin that holds the shape, sets the diameter, gives you the snap when you bite a good bratwurst, and hangs the thing on a stick in the smoker. Get the casing wrong and it doesn’t matter how perfect your grind was; you’ll blow it out at the horn, or stuff a snack stick the size of a summer sausage, or end up with a link full of air pockets that go gray and greasy in the middle.
None of the tools here cost much. A tube of hog rings, a pair of pliers, a pricker you could make from a wine cork and some needles — the whole kit fits in a coffee can. But knowing which casing and which tube for which product is one of those things that took me a while to sort out, mostly because nobody explains the one idea that makes it all click: caliber. So let’s start there, because it’s the whole game.
Caliber sets the product, not the animal
Here’s the thing I wish somebody had told me forty years ago. When you buy natural casings, they’re sold by the caliber — the diameter across the casing, measured in millimeters — and that diameter is what decides what product you’re making, far more than which animal the casing came from. People fixate on “hog casing” versus “sheep casing” as if the species were the point. It isn’t. The point is the number.
Think about it from the sausage backward. A breakfast link and a snack stick are thin — you want a lot of surface, a quick cook, a delicate bite — so you need a narrow casing, somewhere around 20 to 24 mm. A bratwurst or a ring of my grandfather’s kielbasa wants to be about the thickness of your thumb, plump and juicy, so you’re in the 32 to 36 mm range. A big salami or a bologna you’ll slice on a deli slicer needs to be fat, 50 mm and up. The animal happens to correlate with those sizes — sheep intestines are naturally the smallest, hog mid-sized, beef the biggest — but you’re really choosing a diameter, and the animal just tells you which drawer that diameter lives in. Buy your casings by the caliber the recipe wants and the species takes care of itself.
Natural casings are cleaned animal intestine — hog, sheep, or beef, plus a few specialty items from further along the beef gut (middles and bungs). They’re edible, they give you the best bite there is — that natural “pop” or snap when you bite through — and the smoke and the cure penetrate them beautifully. Their one honest drawback is that they’re a natural product, so the diameter wanders. A “32–35 mm” hog casing is a range, not a spec; one stretch will run 33, the next 35, and your links come out a little irregular. That irregularity is part of the charm of a hand-made sausage, but if you need every link identical — a commercial pack of hot dogs, say — natural casings won’t give you that, and you go to collagen or fibrous instead.
Here’s the caliber chart I actually keep in my head, matched to what I make:
| Caliber (diameter) | Casing | What I stuff into it |
|---|---|---|
| 19–21 mm | Sheep (narrow) | Snack sticks, my thinnest breakfast links |
| 22–24 mm | Sheep | Breakfast links, thin bratwurst, hot dogs |
| 26–28 mm | Hog (narrow) | Fresh sausage, thinner Italian links |
| 29–32 mm | Hog | Italian sausage, chorizo, bratwurst |
| 32–35 mm | Hog | Bratwurst, kielbasa, most smoked sausage — the workhorse |
| 35–38+ mm | Hog (wide) | Big smoked rings, thick kielbasa |
| 40–43 mm | Beef middle | Ring bologna, mettwurst, some salami |
| 45–55+ mm | Beef middle | Salami, summer sausage, cervelat |
| 55 mm and up | Beef bung / cap | Big dry salami, capicola-style, mortadella |
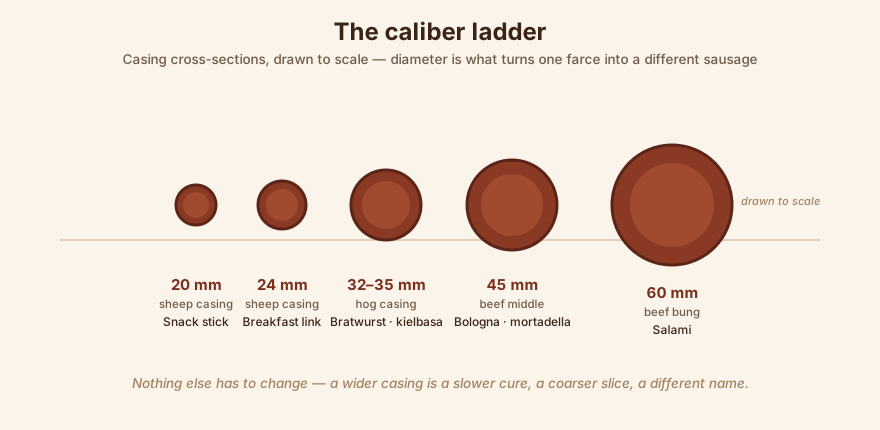
Beef middles and bungs deserve their own line because they’re where the big cured salamis come from. A middle is a section of beef intestine, straight and roomy, that gives you that 45–60 mm salami caliber; a bung is even bigger and rounder, the classic casing for a fat mortadella or a whole-muscle-looking dry salami. They’re the reason a beef casing reads as “the big one” — you’re not making a breakfast link out of a beef bung, you’re making something you’ll cure for weeks and slice thin. Which brings us to the other two families.
Collagen and fibrous — when uniform beats natural
Not everything wants a natural casing, and two manufactured casings cover the jobs natural ones do poorly.
Collagen casings are made from reconstituted beef-hide collagen — the same protein that’s in the natural gut, just processed into a perfectly uniform tube. They’re edible, dead consistent in diameter (a 21 mm collagen casing is 21 mm the whole length, every time), and — this is the convenient part — you use them straight from the pack, dry, with no soaking. Slide one onto the horn and go. They’re the reason a lot of makers who hate wrestling with natural casings still get clean, even links. What you give up is the bite: collagen doesn’t “pop” the way a natural hog casing does, and a careful eater can feel the difference. For a fresh sausage you’ll cook and eat in a day or two — breakfast links, a batch of snack sticks — collagen is a completely legitimate choice, and it’s what I reach for when I want speed and uniformity over that last bit of snap.
Fibrous casings are the other manufactured family, and they’re a different animal entirely. They’re built on a cellulose (plant-fiber) base, they’re not edible — you peel them off before you eat the sausage — and they’re strong and perfectly uniform. This is the casing for summer sausage, bologna, large cooked and smoked sausages — anything big that has to hold its shape through a long cook or a long hang and then get sliced. Many fibrous casings come pre-stuck, which just means they’ve been pre-perforated with tiny holes so air and moisture can escape as the sausage cooks and cools; you’ll see “pre-stuck” right on the pack. They also often come printed, and they take smoke color well through the cellulose.
The one rule you cannot skip with fibrous casings: soak them first. They come stiff and papery, and if you try to load a dry one onto the horn it’ll crack and split. Soak them about 30 minutes in warm water (some brands say 20, I give them the full half hour to be safe) until they’re pliable and slightly tacky. Then they slide on and stuff clean. Skip the soak and you’ll fight a stiff, splitting tube the whole batch — I’ve done it, once, and never again. Collagen wants no soak, natural wants a rinse-and-flush, fibrous wants a 30-minute warm soak; keep those three straight and you’ve solved most of the casing headaches before they start.
Casing prep — salt, rinse, flush
Natural casings come to you packed in salt (sometimes in a salt brine), and that salt is what preserves them — a tub of salted hog casings keeps in the fridge for a year or more. But that also means they arrive stiff, salty, and collapsed shut, and you have to condition them before they’ll take a stuffing.
My routine, every time:
- Pull out only what I need and leave the rest buried in their salt. Once a casing’s been rinsed, its clock starts; the salted remainder goes right back in the fridge.
- Rinse the salt off under cool running water, working the casing through my fingers to get the surface salt off.
- Soak them for a bit in warm — not hot — water to relax them and draw out the deep salt. I’ll often use a warm non-iodized salt-water soak, roughly a cup of salt to a gallon, which conditions them without leaching all their character; iodized salt can off-flavor them, so it’s plain salt or nothing.
- Flush water through the inside. This is the step beginners skip and it’s the important one. I find one open end, fit it over the faucet or a stuffing horn, and run water through the lumen of the casing. Two things happen: the casing opens up and untangles so it’ll feed onto the horn without kinking, and any holes or weak spots show themselves instantly — water jets out the side where there’s a tear. Better to find that hole at the sink than three feet into a stuffed link that then blows out. A casing that flushes clean end to end is a casing you can trust.
Then it’s onto the horn. Loading the horn is its own little skill: you slide the entire wet casing onto the stuffing spout like pushing a shirtsleeve up your arm, bunching it all on in a ruched-up wad at the base, and you leave a tail hanging off the end — three or four inches of empty casing that you’ll tie or ring off after the first bit of farce comes through. (I don’t tie the very end before stuffing; I let a little meat come out first to push the air ahead of it, then tie. Tying first traps a big air bubble at the nose of your first link.) Then you start the stuffer and let the casing pay off the horn on its own as it fills — the pressure of the incoming farce feeds it off the spout. Your hands aren’t pulling it; they’re just cradling the filling sausage and controlling how tight it packs. All of that lives in more detail on the stuffers page, and the actual making — mixing, stuffing pressure, how the farce should feel — is over in the sausage program itself.
⭐ The small tools — my own kit
Here’s the part I get asked about most, because these are the cheap, unglamorous tools that don’t come with any machine and that nobody tells you to buy. This is what actually lives in my casing can.
Hog rings and hog-ring pliers
A hog ring is a small C-shaped metal ring — the same kind used in upholstery and fencing — and hog-ring pliers are the special pliers that crimp it closed into a tight circle. I use these constantly to close off the ends of fibrous casings. A big summer-sausage fibrous casing is too stiff and too slick to tie a reliable knot in — twine slips right off the cellulose — so instead you gather the end, lay a hog ring across the gathered neck, and crimp it shut with the pliers. It’s fast, it’s dead reliable, and it holds against the internal pressure of a fully packed casing far better than any knot I’ve tried. The same trick closes the mouth of a netting bag for a netted roast or a big salami. I’ve had the same pair of pliers for decades; buy the rings by the box and you’ll never run out.
Matching the tube to the caliber
This is where caliber comes back around to bite you if you ignore it. The stuffing tube (the horn) has to match the casing you’re filling — and the tube is what you match to the caliber, not the machine. A tube that’s too big for the casing stretches it to the tearing point at the mouth; a tube too small chokes the flow and packs the meat too hard. For the 19–21 mm snack-stick casings I stuff, I run a 12 mm tube — that’s the pairing that works, a 12 mm horn feeding a ~20 mm casing, leaving just enough room for the casing to fill out without being stretched drum-tight at the horn or choked down to a trickle. Every stuffer comes with a set of tubes in a few diameters exactly so you can match them up the ladder: a small tube for sheep casings, a mid tube for hog, a fat tube for beef middles and big fibrous. Reach for the tube that fits the caliber and stuffing gets easy; grab the wrong one and you’ll fight the whole batch. The tube lineup and how they thread onto my motorized stuffer are on the stuffers page.
The sausage pricker — and the folklore about it
A sausage pricker is a spiked tool — a little cluster of needles on a handle, or a spiked roller — whose one honest job is to release trapped air pockets from a stuffed link. No matter how careful you are, some air gets in: a bubble caught as the casing loaded, a void where the farce didn’t quite fill the corner of a twist. Those pockets show up as soft, hollow spots under the casing, and in a cured or dried product they’re worse than cosmetic — air pockets are where moisture collects and spoilage starts, a little gray cavern in the middle of your salami. So you find the bubble, and you prick it — you don’t stab it. A prick is a tiny surface puncture that lets the trapped air hiss out and the casing settle down onto the meat; the casing then self-seals around the pinhole. A stab is a gaping hole that leaks fat, weeps juice, and gives the casing a place to tear as it fills. Prick, don’t stab — small, shallow, just enough to vent the air.
Now here’s the folklore I want to flag, because it’s everywhere and it’s mostly wrong. You’ll hear that you should prick every sausage all over before you cook it, so it won’t burst. For a fresh sausage headed for the pan or the grill, that’s a mistake, and I’d talk you out of it. All those holes do is give the juice and the melted fat a highway straight out of the link — you’re deliberately draining the very thing that makes the sausage juicy, and you end up with a dry, tight, sad little link swimming in its own rendered fat. If your sausages burst when you cook them, the fix isn’t a pricker, it’s lower heat and turning them — a sausage bursts because you blasted it and the interior steam had nowhere to go, and the cure for that is a gentler pan, not a hundred punctures. Pricking is for venting genuine air pockets in the raw stuffed link, and for cured and dried products where trapped air is a spoilage risk — it is not a reflexive step you do to every fresh link before it hits the heat. I prick air bubbles at the bench when I find them; I do not perforate my bratwursts before they go on the grill, and neither should you.
Linking and hanging — the pinch, the twist, the loop
Once you’ve got a long stuffed coil, you turn it into individual links, and the technique is the pinch-and-twist. You pinch the coil flat where you want a link to end, then spin that pinched section a few full turns to seal it off, measure down the length you want for the next link, pinch again, twist again — and so on down the whole coil. The pinch pushes the farce back on both sides so you’re twisting an empty neck of casing, which seals cleanly; twisting a neck full of meat just squeezes farce out the ends.
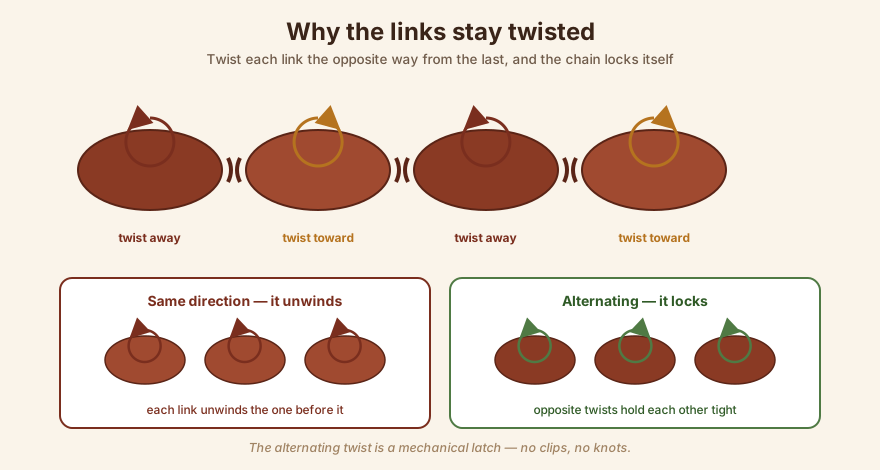
There’s one trick that makes the difference between links that hold and links that unravel on the table: alternate the direction of the twist on each successive link. Twist the first link away from you, the next one toward you, the next away again — flip the direction every time. If you twist every link the same way, you’re just winding up one long spring, and the tension stored in one link unwinds the one before it; the whole chain slowly comes loose. Alternating the direction means each link’s twist works against its neighbor’s instead of with it, and the tensions lock each other in place. It feels fiddly for the first dozen and then your hands just do it. This is the single most useful thing I know about linking, and the sausage program page walks through the rhythm of it in more detail.
For anything I’m going to hang, cure, or smoke, I don’t rely on the twist alone — I tie the ends with butcher’s twine. A twist will hold a fresh link you’re cooking today, but a link that has to hang in a smoker for hours, or in a chamber for weeks, wants a real knot. So I tie off each link’s neck with a length of natural cotton butcher’s twine, and for anything going on a rack I tie it into a loop — leave enough twine to form a hanging bight so the link can go over a smoke stick.
A smoke stick is just a straight rod — a dowel, a piece of stainless tube — that the looped links hang from, spaced so air and smoke circulate all the way around each one. That circulation is the whole point of hanging rather than laying them flat: a sausage lying on a rack has a contact patch that doesn’t get smoke or airflow, and it’ll show as a pale, damp stripe. Hung by a loop on a stick, every square inch of the casing is exposed, and the link colors and dries evenly all the way around. My smokers page gets into the hanging and the smoke; here it’s enough to say that the loop you tie at the linking bench is what makes the hang work.
That’s the casing kit, start to finish: choose the casing by its caliber, because the diameter is what makes the product; prep it for its type — salt-rinse-and-flush for natural, a 30-minute warm soak for fibrous, nothing at all for collagen; load the horn with a matched tube and a tail left long; close the ends with hog rings where a knot won’t hold; vent real air pockets with a prick, not a stab, and don’t reflexively perforate a fresh link on its way to the pan; and turn the coil into links with a pinch, an alternating twist, and a tied loop for anything that hangs. It’s a coffee can of cheap tools and one good idea about diameter. You can see how it all sits alongside my grinder and stuffer on my bench, and if you want a caliber to aim at, go stuff a batch of bratwurst into 32–35 mm hog casing — it’s the friendliest place to start.
Part of Sausage Equipment. Next: once your links are stuffed, tied, and smoked, you have to keep them — packaging, vacuum sealing, and freezer life are up next. Back to the sausage program.
Comments (0)