The Grinder
Everything downstream depends on this machine. You can own the best stuffer money buys, a smokehouse that holds temperature to the degree, casings soaked exactly right — and if the grind is wrong, none of it saves you. A smeared, greasy, air-shot grind is a smeared, greasy, air-shot sausage. Forty years in, the grinder is still the piece of equipment I think about first when a batch goes sideways, and it’s almost always the answer.
So let me tell you how it actually works, how mine is set up, and the handful of things that separate a clean grind from a wet mess. Most of it isn’t complicated. It’s just that the folklore gets the causes backward, and the internet keeps repeating it.
How a grinder actually works
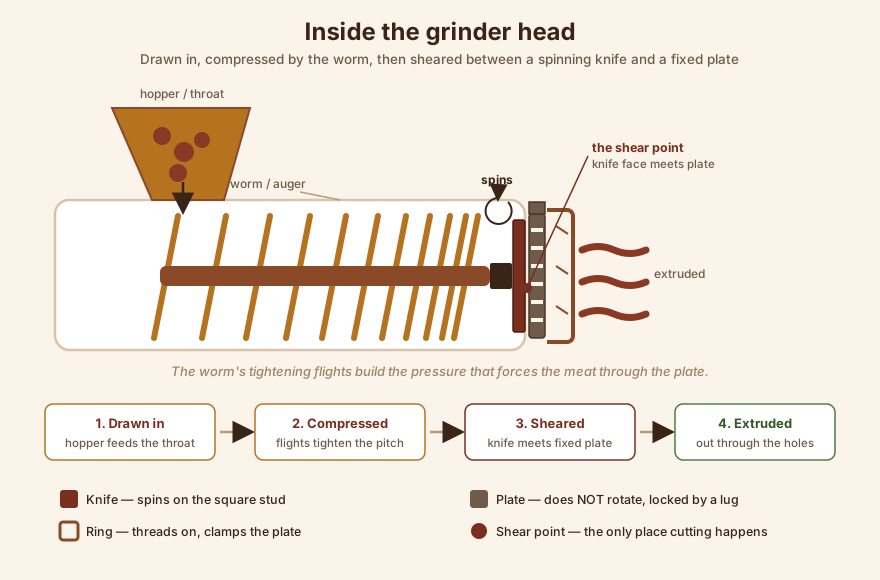
A meat grinder is not a blender and it is not a chopper. It is a shearing extruder — it cuts meat with a moving edge against a fixed edge, exactly like a pair of scissors, and then pushes the cut pieces out through holes. Four parts do the work, and the order they act in is the whole story.
The worm (auger, feed screw). This is the Archimedean screw that turns inside the head. Its flights get shallower toward the front — a decreasing pitch — so as the meat travels forward it’s progressively squeezed and driven with rising pressure. The worm does two jobs: it conveys the meat and it pressurizes it. It does not cut anything. People assume the auger is doing the grinding. It isn’t. It’s the delivery system.
The knife (revolving). A four-wing blade keys onto the square stud at the front of the worm and spins with it. Its flat cutting faces ride directly against the back face of the plate. This is the moving edge of the scissors.
The plate (die). A perforated steel disk, held fixed — a lug or notch locks it to the head so it can’t rotate. The meat is forced against the back of the plate; the spinning knife wings sweep across the plate face and shear the meat against the fixed edge of every hole. One moving edge, one fixed edge, essentially zero gap between them. The sheared columns of meat then extrude through the holes. This is the fixed edge of the scissors, and it’s where the actual cutting happens.
The ring (collar, retaining nut). Threads onto the head and clamps the plate, holding the knife against the plate under light, even pressure.
So the sequence is: worm draws and compresses the meat → knife shears it against the fixed plate → sheared meat extrudes through the holes. Read that again, because the two most common grinding failures both come from breaking it.
The stack order — and why the wrong order smears
From the worm outward, the assembly is always: worm (geared end goes in first) → knife (cutting faces OUT, toward the plate) → plate (flush against the knife) → ring (hand-tight). Get this right every single time and you’ll avoid the two classic disasters.
Knife installed backward. If you put the knife on with its flat cutting faces toward the worm instead of toward the plate, nothing shears. The plate face has nothing sharp riding against it, so the meat just mashes up against the holes and squeezes through as paste — or jams solid. This is the number-one rookie mistake, and it looks like a broken grinder when it’s really a flipped knife. The cutting faces go toward the plate, always.
Ring too loose. If the ring is loose, the plate floats a hair off the knife. That opens a gap between the moving edge and the fixed edge — and a scissors with a gap doesn’t cut, it crushes. Instead of shearing the meat, the grinder squeezes it through the gap, and you get smear (more on that below).
Ring too tight. Crank the ring down hard and you bind the knife against the plate. Now they grind on each other instead of the meat, they overheat, and the motor stalls or the drive gear strips.
The correct feel is hand-tight, then just a touch more — snug enough that the knife and plate stay in contact, loose enough that they aren’t fighting. Most tabletop grinders also put a small thrust washer or spacer on the tail of the worm that keeps the knife and plate lightly loaded together. If yours has one and it goes missing in the dish drainer, contact goes slack and you’ll chase a smear you can’t explain. Know your machine’s parts and count them back into the box.
What the ”#” number means — it is NOT fineness
This one trips up nearly everyone who buys their first real grinder, so let me be blunt about it: the grinder number has nothing to do with how fine it grinds.
The number — #8, #12, #22, #32 — is a standardized plate and throat diameter. It’s an old industry sizing convention, and its whole point is interchangeability: a #12 plate from one manufacturer fits any #12 head, because the plate diameter for a given number is fixed regardless of brand. Here’s roughly where the common sizes land:
| Grinder # | Plate diameter | Metric |
|---|---|---|
| #8 | ~2½” | ~63 mm |
| #10 | 2¾” (shares the #12 plate) | ~70 mm |
| #12 | 2¾” | ~70 mm |
| #22 | 3¼” | ~82 mm |
| #32 | ~3 15/16” | ~100 mm |
A bigger number means a bigger throat and more throughput — you can push more meat through a #32 per minute than a #12 without bogging it down. It does not mean a finer or coarser grind. A #32 with a ¾” plate makes a coarser grind than a #8 with a 1/8” plate, every time.
Fineness is set entirely by the plate’s HOLE size. The number sizes the machine; the plate sizes the grind. Two different knobs. Once that clicks, the whole equipment aisle makes sense: you buy the grinder number for the capacity you need, and you buy a set of plates for the range of grinds you want. Which brings me to my own machine.
⭐ My grinder — a Weston #12 — and my plate chart
My grinder is a Weston #12, model 10-1201, 1 HP / 750 watts. Weston, not Walton’s — people mix those two up constantly, and they’re different companies. Walton’s is a great sausage-supply outfit I buy from; Weston is who built the grinder on my bench. If you go shopping off a forum recommendation, read the name twice.
The #12 sizing puts it squarely in the home-and-prosumer band. That 1 HP motor drives a #12 all day for the batch sizes I run, and it’ll push a #22-scale load if I lean on it. For venison season, for a weekend of kielbasa, for the chorizo I make because you can’t buy decent chorizo in Michigan — it’s the right amount of machine. I’ve never wished it were bigger for anything I actually cook.
What makes a grinder versatile isn’t the motor, though. It’s the plates. Here’s the actual set I run and what each one is for. This is the chart I keep by the bench, worked out over years of batches:
| Plate | Metric | Grind | What I use it for |
|---|---|---|---|
| 1/8” | ~3 mm | Fine | Bologna, franks, force meats, hamburger, beef jerky |
| 3/16” | ~4.5 mm | Medium | Breakfast sausage, hamburger, Polish & Italian sausage |
| 1/4” | ~6 mm | Coarse | Hamburger, salami, summer sausage, pepperoni, bratwurst |
| 5/16” | ~8 mm | Coarse | Hamburger, salami, summer sausage, pepperoni, bratwurst |
| 3/8” | ~10 mm | Coarse | First grind for chili meat & chorizo |
| 1/2” | ~12 mm | Very coarse | First grind for chili meat, stew meat, vegetables |
| 3/4” | ~19 mm | Very coarse | First grind / chunking meat |
| Bean plate | — | (no blade) | Stuffing sausage into casings — used without the knife |
| Stuffing star | — | — | Holds the worm’s thrust while stuffing through a horn |
A few notes on how I actually reach for these.
The 1/8” fine plate is my emulsion-and-jerky plate. Franks, bologna, the finest second grind — anything that wants a tight, uniform particle. It’s also the plate that punishes warm meat the fastest, because you’re forcing everything through the smallest holes and generating the most friction. Keep the meat cold for this one or don’t bother.
The 3/16” medium is the workhorse for links. My breakfast sausage, my Polish, my Italian — they all come off this plate, usually as a second grind after a coarse first pass. It’s the “if I had to keep one plate” plate.
The 1/4” and 5/16” coarse plates are the cured-and-cased range — salami, summer sausage, pepperoni, brats. My grandpa’s kielbasa gets a 1/4” minimum; I want to see the grain of the meat in a finished slice, not a smooth paste. That coarse cut is part of what makes it taste like his did.
The 3/8”, 1/2”, and 3/4” are my first-grind and chunking plates. Chili meat, chorizo, stew meat, vegetables — anything that either gets a second grind later or wants to stay in visible pieces. The 3/4” is barely grinding at all; it’s more of a mechanical dicer for when I want big chunks fast.
Then the two odd ones. The bean plate is a plate with one or a few large openings that I run without a knife to stuff sausage into casings — the worm just pushes the already-ground farce straight through the horn instead of cutting it. The stuffing star does the same job from the other direction: it holds the worm’s forward thrust while giving the meat a clear path to the tube. I want to be honest about these: grinder-stuffing is a compromise, not equal to a real stuffer. Because you’re running the meat back through the worm, you re-work it, re-smear the fat, and beat in air. It works in a pinch, and for years it’s all I had. But if you make sausage regularly, a dedicated vertical stuffer is worth every penny. I get into exactly why on the stuffers page — the short version is that a stuffer pushes the meat without re-grinding it.
The plates and knives get their own deep treatment on the plates-and-knives page, including the one thing about them that matters more than which hole size you grab: the knife and plate are a matched, lapped pair. Read that page before you buy a spare plate.
Single grind vs. double grind
How many times you run the meat through depends on the product, and it’s worth understanding why rather than just following a recipe.
Coarse products get one pass. Chili grind, chorizo, linguiça, some rustic fresh sausage — I run these once through a coarse plate (3/8” to 1/2”) and stop. The whole appeal is visible, distinct pieces of meat and fat. Grinding twice would defeat the texture I’m after.
Most links get two passes. I grind coarse first — a 3/8” or 5/16” first pass moves the meat through fast and sets the fat-to-lean distribution — then I regrind finer, usually through the 3/16”, for a tighter, better-bound texture. There’s a real reason this beats a single fine pass: forcing everything through a fine plate in one shot overworks and heats the meat, and it binds worse. Coarse-then-fine gives a cleaner cut and better bind with less heat. It’s the standard trade practice for a reason.
Fine emulsion products push finer still — down to the 1/8” — but at that point you’re really at the edge of what a grinder does, and true emulsified sausage (franks, bologna, mortadella) wants a bowl chopper to go all the way to a paste. That’s a separate machine and a separate discussion.
The rule of thumb I’d give a beginner: when in doubt, grind coarse first and fine second. You almost never regret it, and you dodge the overheating that a single fine pass invites.
⭐ Why a dull knife smears the fat — get the order right
Here is the single most important thing on this page, and it’s the thing the internet most reliably gets backward. When a batch comes out wet, greasy, and pasty — the fat visibly smeared into the lean, the whole mess looking like it’s been finger-painted rather than cut — people blame their knife and go buy a new one. Sometimes that helps. But the knife is the second cause, not the first.
Fat smear is a temperature failure first.
Fat is only a firm, cuttable solid while it’s cold. As it warms toward body temperature it softens, and then it starts to render — to melt. Soft, warm fat smears through the smallest gap and coats everything it touches. It doesn’t matter how sharp your knife is: warm fat will ooze and paste no matter what, because you’re no longer cutting a solid, you’re pushing a grease. This is why every experienced sausage maker you’ll ever meet is obsessive about cold meat. My rule is meat at about 30°F — half-frozen, firm to a hard poke, crystals just starting. At that temperature the fat is a solid the knife can shear cleanly, and it stays a solid all the way through the head.
Now, the knife. A dull or knife/plate-mismatched grinder gets you to smear faster. Here’s the mechanism, and it’s a compounding one:
- A dull knife can’t slice the fat and connective tissue cleanly. Instead of severing them, it drags and crushes and mashes them. Even cold-ish fat, crushed rather than cut, gets squeezed and smeared into the lean as a greasy paste. And the friction of a dull edge grinding away generates heat — which warms the fat — which makes it smear more. It’s a spiral.
- A knife/plate mismatch — a knife lapped flat to one plate now run against a different or worn plate — leaves microscopic gaps between the two faces. Fat and gristle aren’t sheared at those gaps; they’re extruded through them and smeared. This is exactly why knife and plate are a matched pair, and it’s covered in full on the plates-and-knives page.
So the two causes stack. Warm meat plus a dull knife is the worst case — the fat is already soft, and the crushing edge both smears it mechanically and heats it further. Cold meat with a sharp, matched knife-plate cuts clean fat into clean particles and the output looks like distinct grains, not paste.
The fix is not “buy a sharper knife” or “keep it colder” — it’s both, always, together:
- Keep the meat cold. ~30°F, half-frozen. Chill the meat, and chill the grinder parts too (I keep my worm, knife, and plates in the freezer before a big grind).
- Keep the knife sharp. A sharp, flat edge shears; a dull one crushes.
- Keep the knife and plate matched. A lapped pair mates with no gap. Don’t mix plates from different histories with a knife lapped to another.
- Don’t dawdle. Every minute the meat sits out, it warms. Grind in batches, keep the rest in the freezer, and if things start looking wet, stop and re-chill everything. I’ve thrown the whole works — meat, worm, knife, plate — back in the freezer for twenty minutes mid-grind more than once. It’s never the wrong call.
I want to hammer this because it’s the correction that saves the most batches: temperature first, edge second. A brand-new razor-sharp knife will still smear warm fat. A slightly dull knife will grind clean if the meat is near-frozen and you don’t overwork it. Get the temperature right and you’ve solved most of the problem; keep the knife sharp and matched and you’ve solved the rest.
Keeping it cold, and keeping it clean
Everything above comes back to the same two disciplines: cold and clean.
Cold. I’ve said it, but the parts matter as much as the meat. Metal holds cold, and a chilled worm, knife, and plate keep the meat from warming as it passes through — the head is where the friction heat happens, so a cold head buys you real time. Before a big grind I’ll put the whole disassembled head in the freezer for half an hour, cube my meat and spread it on sheet pans so it chills evenly to that 30°F half-frozen point, and grind into a bowl sitting in ice. Small habits, but they’re the difference between a clean coarse grind and a greasy one on a warm day. And this is why I don’t over-knead when I mix — hand heat melts the fat you worked so hard to keep solid. Mix cold, mix briefly, get it into casing.
Clean. A grinder is a food machine with a hundred little edges and channels for meat to hide in, and ground meat is about the most perishable thing in the kitchen. I break the head all the way down after every use — worm, knife, plate, ring, the head itself — and wash each piece by hand. A note that matters if you own good plates: carbon-steel knives and plates flash-rust if you leave them wet. They take a keener edge than stainless, which is why quality grinders use them, but the trade-off is you have to dry them completely and wipe them with a food-safe oil before they go back in the drawer. Stainless resists rust but won’t hold as fine an edge — a real trade-off, not a free upgrade, and worth knowing which your plates are.
Run the head under hot water, break it down, hand-wash, dry thoroughly, oil the carbon steel, and count your parts back into the box — including that little thrust washer. Do that every time and the grinder outlives you. Mine’s been on my bench for decades and it still shears as clean as the day I set it up.
The grinder is the foundation, but it’s only half a system. The plate and knife riding against each other are where the actual cut happens, and they’ve got their own rules — matched pairs, lapping, hole geometry, when to reach for which. That’s next.
For the recipes that come off this machine, the whole sausage section is built on it, and you can browse every sausage recipe I’ve got. To see how the grinder sits alongside the rest of my setup, there’s my bench.
Next: Plates & Knives — the matched pair that actually does the cutting, and why keeping them lapped and sharp is the other half of a clean grind.
Comments (0)