Linking and Tying
You have a four-foot rope of stuffed casing on the bench. Turning it into a chain of links that will not unwind is a two-minute skill that looks like sleight of hand the first time you watch someone do it, and is completely obvious the moment you understand the one principle behind it.
The principle: alternate the direction of the twist.
That’s it. That’s the whole trick. If you twist every link the same way, the casing is a spring under torsion and it will unwind itself the moment you set it down. If you twist each link in the opposite direction from the one before, each twist is locked by its neighbor and the chain is stable.
The basic twist, in pairs
The method I use, and the one almost every butcher uses:
- Lay the whole stuffed rope on the bench and even out the filling by running your hands along it — pushing meat from any tight section into any slack one. Do this before you start twisting; you cannot fix it afterward.
- Measure the first link from the tied end and pinch it off — thumb and forefinger of both hands, squeezing the casing until the meat is displaced clear and you have a section of empty casing between two filled sections.
- Spin that link — rotate it four or five full turns. Direction: let’s say away from you.
- Measure the second link, pinch, and spin it toward you — the opposite direction.
- Continue, alternating every link.
That is the “one-at-a-time alternating” method and it is perfectly good.
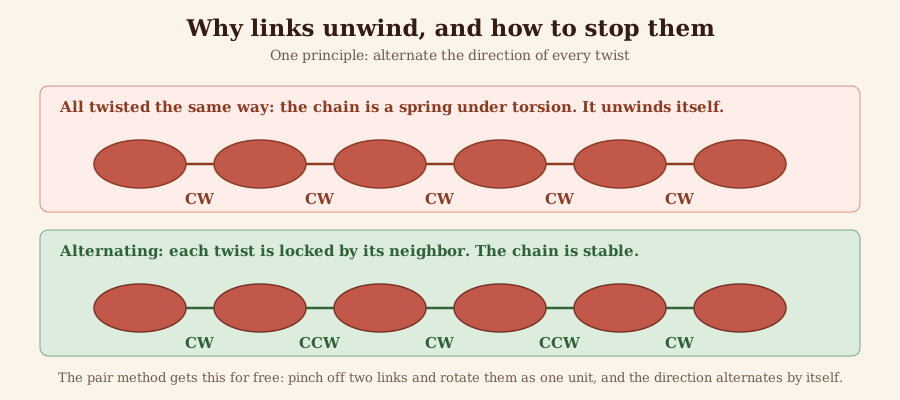
The entire trick, in one picture.
The pair method — faster, and what a butcher actually does
Once you’re comfortable, the professional method is quicker and produces a more even chain:
- Pinch off two links at once — measure link 1, then link 2, and pinch at the far end of link 2.
- Pass the pair through the loop formed between them, or simply rotate the two-link segment as a unit several turns.
- Move down, repeat.
Because you rotate a two-link unit, the twist naturally alternates without you having to think about direction. It halves the number of operations, and it is why a butcher can link a whole run in the time it takes a beginner to do six.
Consistency, and how to actually get it
Even links look professional and, more usefully, cook evenly. A chain with a 4-inch link next to a 7-inch one will always have one that’s dry when the other is done.
Mark your bench. A strip of tape at the link length you want, or a notch on the board. Eyeballing drifts — you get longer as you go, every time.
Common lengths:
| Sausage | Link length |
|---|---|
| Breakfast links | 3–4” |
| Bratwurst, Italian, Polish | 5–6” |
| Landjäger | ~32 cm tied, twisted at the middle → a pair of ~16 cm sticks, 80–125 g each |
| Snack sticks | 6–12” |
| Ring bologna / kielbasa | one continuous ring, tied |
Don’t over-twist. Four or five turns is plenty. Ten turns doesn’t lock it any better and it thins the casing at the twist until it tears.
Landjäger and the pressed pair
Worth calling out because it’s a distinct geometry and it confused me for years.
A Landjäger is not made as a chain of links. You tie off a length of about 32 cm, cut it free from the run, and then twist that single length at its middle. That gives you two sticks joined at one end — the pair. Each finished stick lands at 80–125 g.
The pair then goes into the press flat, which is where the rectangular cross-section comes from, and Landjäger is pressed, hung, smoked, sold and eaten in pairs. A single Landjäger is a loose end. The German food code describes it plainly: usually in pork small intestine, pressed flat.
Tying, and when you need it
Twisting is enough for fresh sausage that will be cooked within a few days. Tying is for anything that has to hang.
Once a sausage is going to hang in a smoker or a drying chamber for hours or weeks, gravity is working on every twist, and a twist alone will eventually give. So:
Butcher’s twine, natural fiber. Not synthetic — it can melt in a smoker. Not colored — the dye can transfer.
The basic tie: a simple overhand knot pulled snug into the twist, then a second one on top. Trim the ends short so they don’t catch or burn.
Tie both ends of a hanging chain, and tie at each twist if the links are heavy.
For a hanging loop, leave a generous tail on the first tie and knot it into a loop you can hang over a dowel.
The butcher’s slip knot — a loop you can tighten in one pull — is worth learning if you tie a lot. Form a loop, pass the working end through, and pull. It seats itself into the twist without you having to hold tension with a third hand.
Hog rings
For fibrous casings — summer sausage, bologna, the big chubs — twine is fiddly and unreliable because the casing is stiff and slippery. Hog rings and hog ring pliers are the right tool: a C-shaped metal clip crimped closed over the gathered casing end.
From my own notes: fibrous casings get soaked 30 minutes in warm water, and the closed end gets crimped with a hog ring. It takes two seconds, it doesn’t slip, and it survives a smokehouse.
Most fibrous casings come pre-stuck — one end already closed — so you only crimp the open end after filling.
Coiling
Some sausages aren’t linked at all. Kielbasa, some Italian, Cumberland, boerewors — these are made as one continuous rope and coiled.
Coil flat on a tray as it comes off the stuffer. Don’t let it hang. Tie the two ends together to close the ring, or run a skewer through the coil to hold it.
A coil cooks and smokes differently from links — more surface contact with itself, less exposed area — so allow more time and turn it.
Hanging: the part that matters for smoked and cured
How you hang a sausage determines whether it comes out of the smoker or the chamber the shape you wanted.
Space them. Links must not touch. Anywhere two sausages are in contact, smoke doesn’t reach and moisture doesn’t leave — you get a pale wet patch that stays pale and wet, and in a cured sausage it’s a spoilage risk.
Hang from a dowel, not from a hook through the meat. Drape the chain over a smooth wooden or stainless rod. A hook driven through a link is a hole through the casing, and on a dried sausage that’s an entry point.
Weight matters. A fresh chain is heavy and the casings are soft. Twists that were fine on the bench can pull apart hanging. This is exactly why you tie.
Let the surface dry before smoking. From my own smoking notes: the first hour in the smoker should be dry, dampers open, no water pan, to dry the surface. Skip that and smoke won’t adhere — you get a streaky, blotchy appearance instead of an even color. The full schedule is in the curing and smoking section.
What goes wrong
- The chain unwinds. You twisted every link the same direction. Alternate.
- Casing tears at the twist. Over-stuffed, or over-twisted. Both.
- Links wildly uneven. Mark your bench, and even the filling out before you twist.
- A link is loose and floppy while its neighbors are firm. Meat migrated during twisting. Even it out first.
- Pale wet patches after smoking. They touched.
- Sausages on the floor of the smoker. Twists gave under weight. Tie.
Part of Making Sausage. Next: patties and bulk — everything above, minus the casing.
Comments (0)